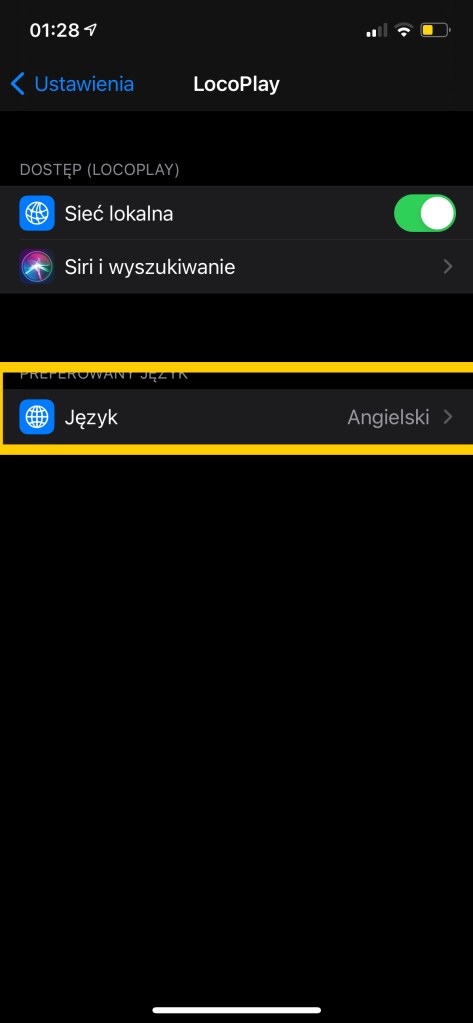
- Przejdź do ustawień iOS
- Wyszukaj LocoPlay
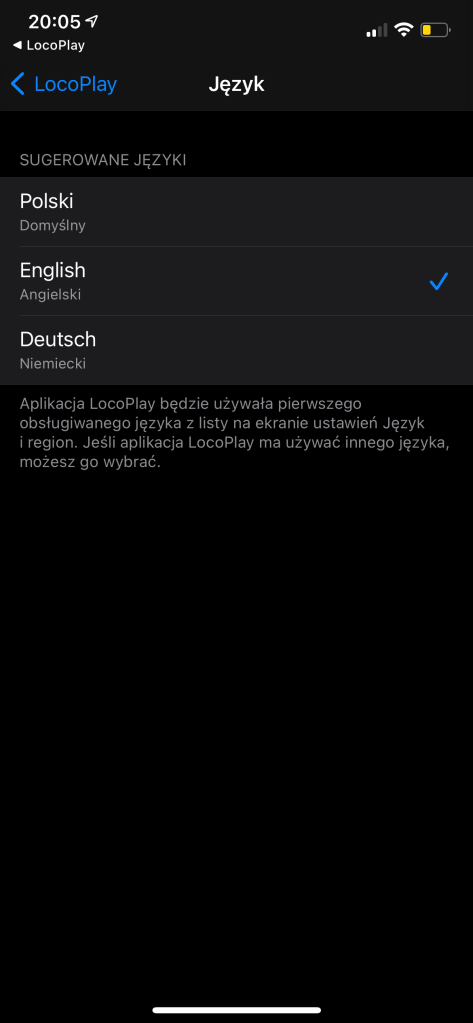
- Przejdź do wyboru języka
- Obsługiwane języki: angielski, polski, niemiecki

Mobile app to automate DCC Model Trains ride
The power of the LocoPlay App lies in the ability of controlling one or more Locos at a time, recording the Events and replaying them so the trains are moving automatically.
Once you’ve done your First Journey you may continue to the Steering and Record Center.
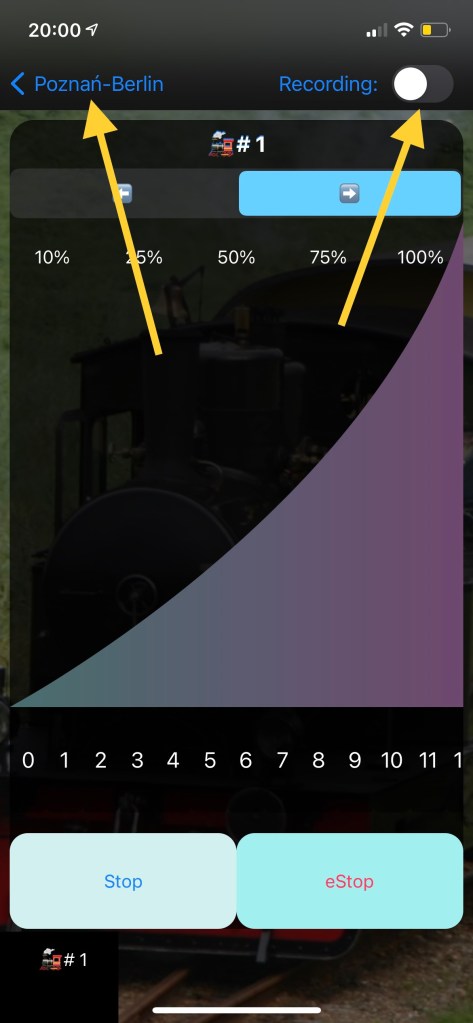
Open a Journey and make sure there is at least one event with Loco address. Open the Control and Record Center by tapping on the gamepad icon in the bottom-right corner:
If Only one Loco address is used in the Journey the Control Panel will look like this:
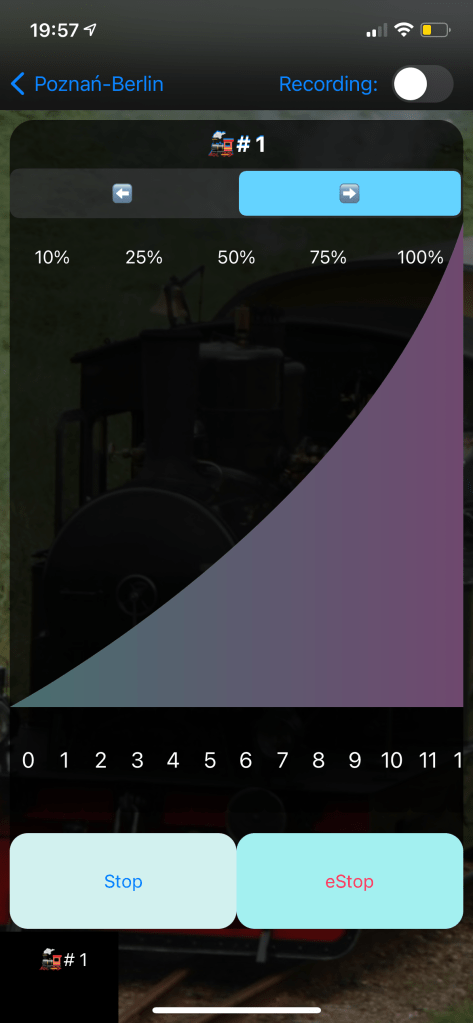
To start recording your activities (new Events) tap the Record switch button at the top right corner.
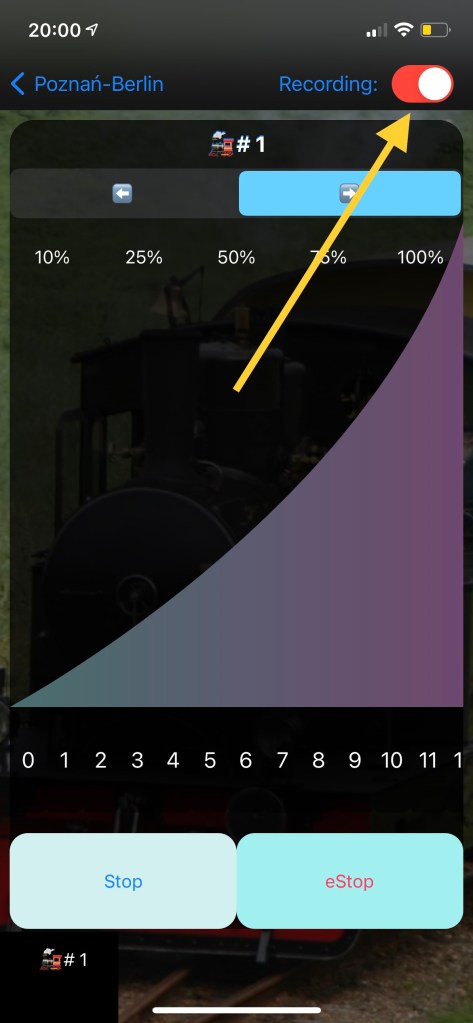
You may start recording Events now by adjusting speed, changing drive direction or switching functions. If you’re connected to the DCC station the Loco with the given address will react and will be controlled by your activities. Otherwise the Events will only be recorded and addes to the list in the Journey, so you can use this feature being offline from you DCC command station. Let’s play then:
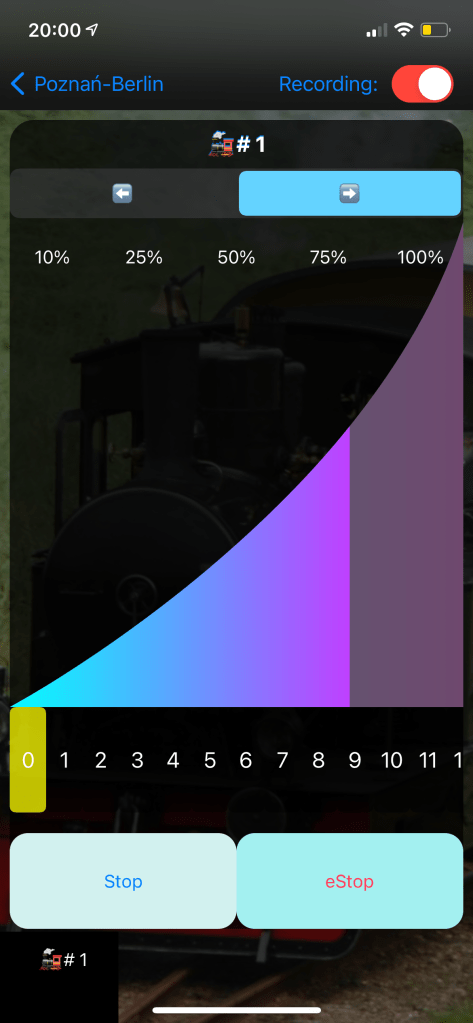
Set the speed – Tap on the 75%. The speed bar will be animated showing acceleration.

Turn on Function F0 (Lights)
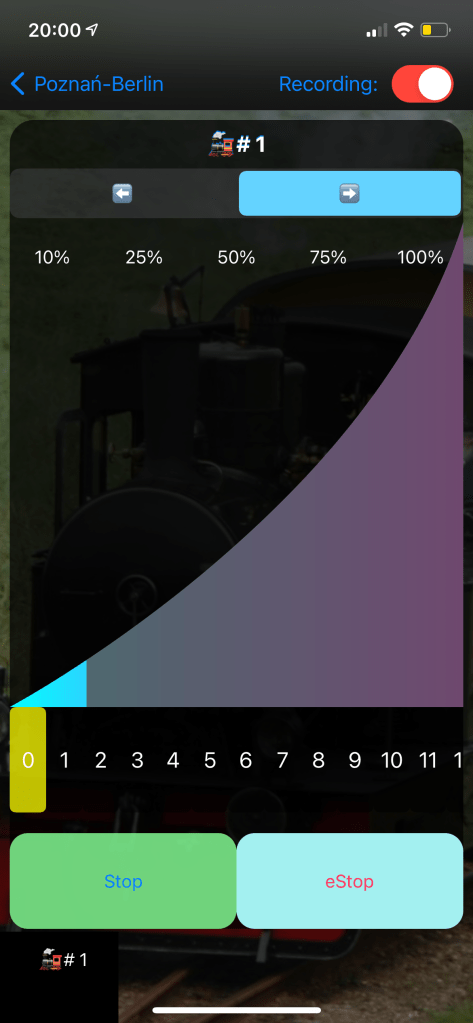
Stop the Train by pressing Stop button. The Speed bar will be animated while going down.
You may stop recording by switching “Record” switch or going back to the Journey screen.
Here’s what your Journey will look like. You can press Play and see what happens.

Please watch the video demonstrating this from scratch:
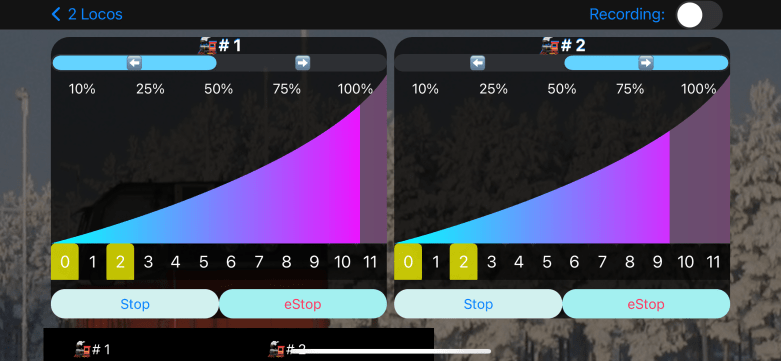
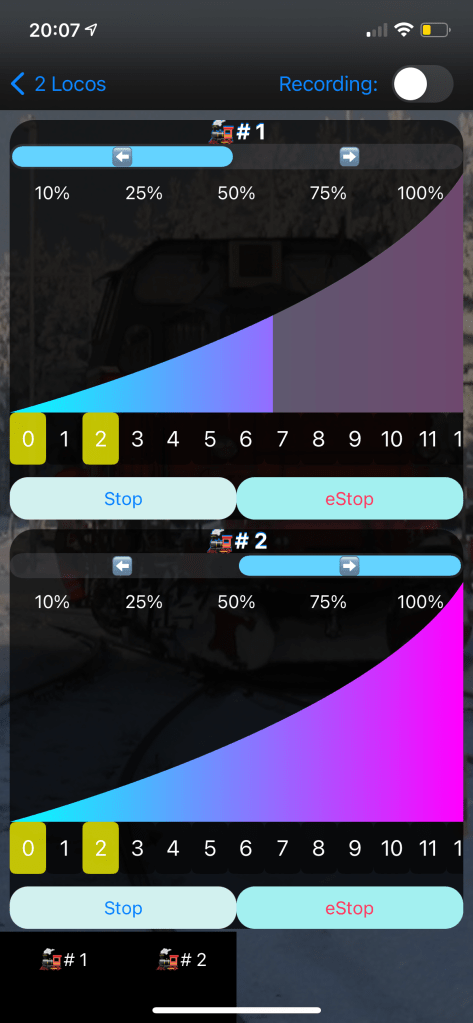
Control and Record Center with two locos.
Horizontal orientation
Vertical Orientation
If the App is not in English you may change language in iOS App Settings. Show me how…
Upon first run of the App you are prompted to accept the conditions of use. Next you can go to Settings to setup a connection to Z21(TM) compatible DCC station.
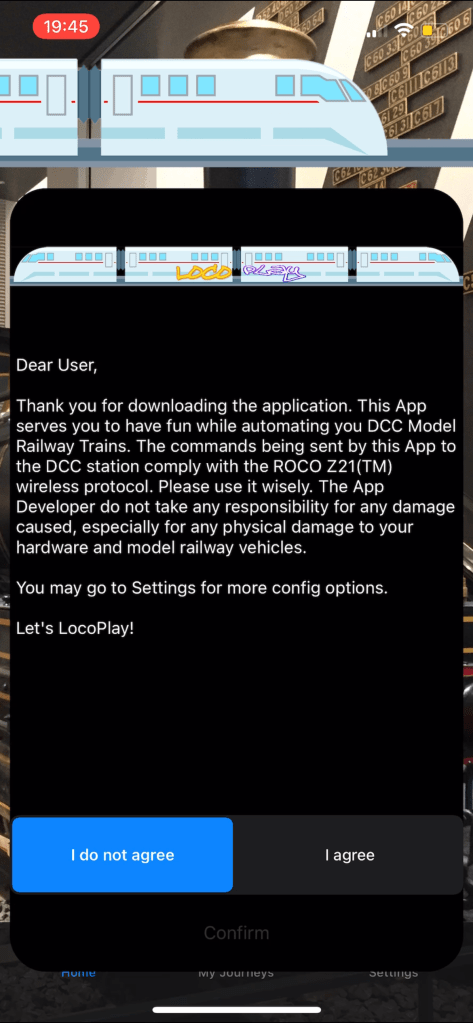
To proceed to use the app please read the information and if you agree select “I agree” and tap “Confirm”. If you don’t agree you may exit the app.
If you confirm the agreement the Main Screen will be dsplayed. You may go to the App Settings to setup you connection to the DCC station.
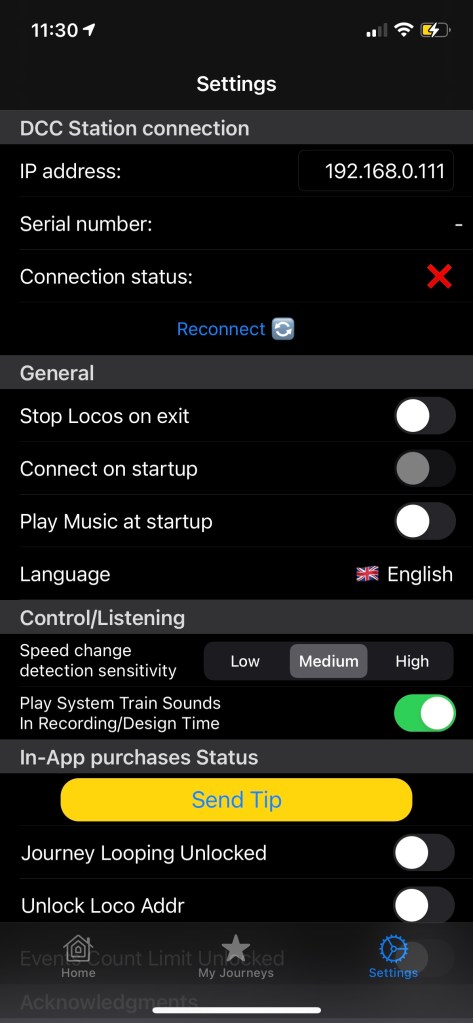
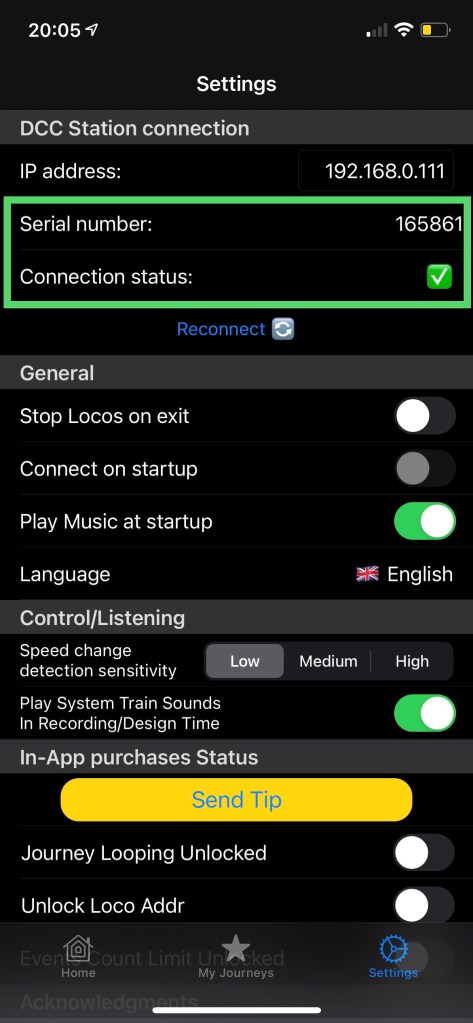
If you’re not connected to the Z21-compatible WiFi the Connection Status will be displayed as X. In that case please proceed to iOS WiFi settings and connect to a Z21 WiFi network (or compatible, e.g. Railbox).
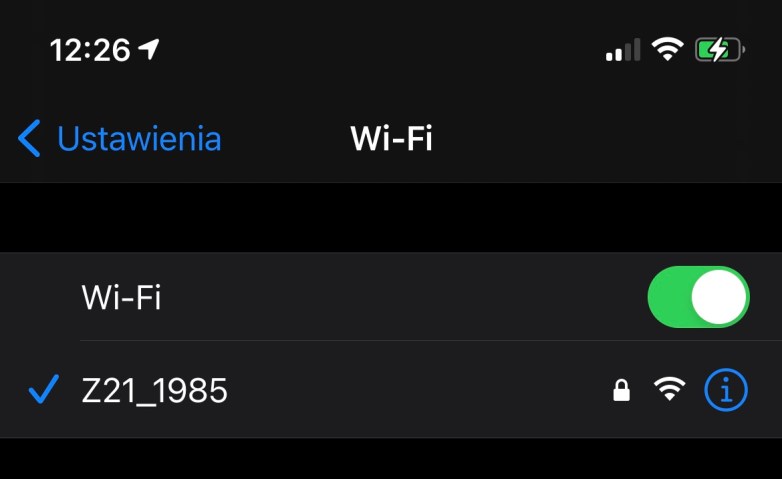
Once you’re connected to the WiFi, go back to the LocoPlay Settings and make sure that the IP address is correct; for Z21 the default IP = 192.168.0.111 (For Raibox could be 192.168.4.111) unless you had set your own. You can edit the IP and then press “Reconnect”.
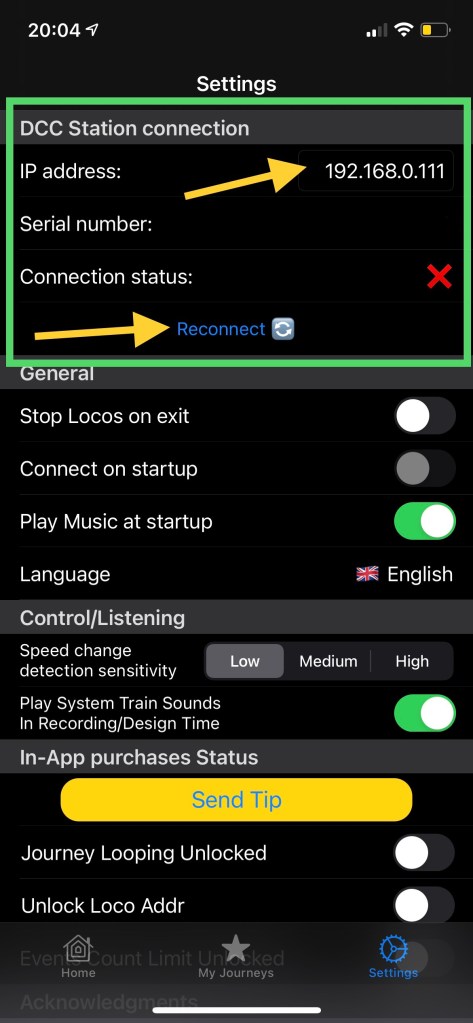
Once successfully connected the Connection status will change to green and the DCC station’s Serial number will be shown.
If you didn’t connect to the DCC station you are still able to use the App, create Journeys and Events being offline your DCC station. However to execute the Journey you must be connected because the App communicates with the DCC station by sending requests and receiving responses.
A Journey is a sequence of Events.
An Event is an atomic one-attribute action that a Loco or App can do:
– Turn on/off a decoder Function, e.g. F0, F1 etc.
– Drive, change driving direction
– Play built-in system sound (via iPhone or bluetooth speaker)
– Wait certain amount of time for the next Event to be executed
While creating Events manually and programming their behavior, no requests are sent to the DCC station. This is only Scheduling, thus you may create your Events first and then play the Journey, and during the playback each Event is converted to a Request being sent to DCC station.
Once you set up the connection to your Z21 DCC station you may start creating your first Journey.
This feature will also work if you’re not connected; you are still able to make a Journey and add Events being offline your DCC station. However to execute the Journey you must be connected.
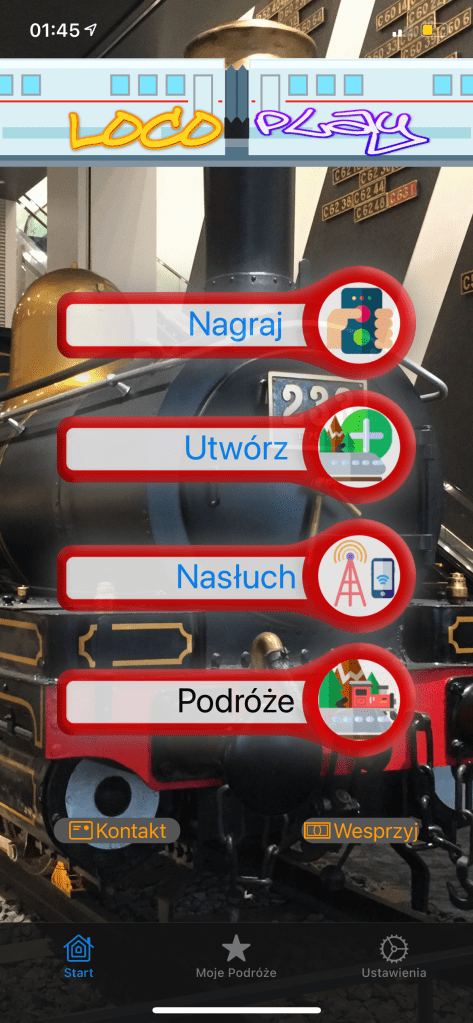
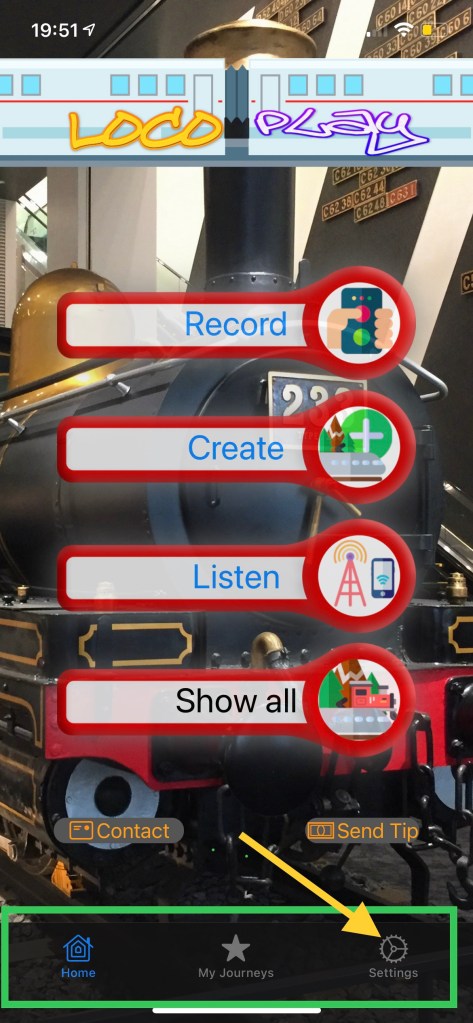
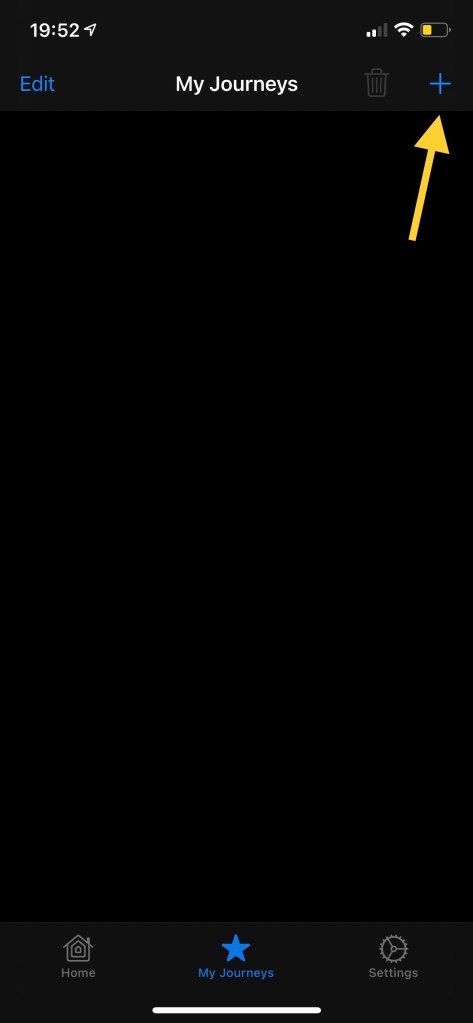
From the Home screen go to “My Journeys” by tapping the icon on the bottom bar.

If it’s the first Journey, the empty “My Journeys” screen will be shown. To add a new Journey tap the “+” in the top right corner.
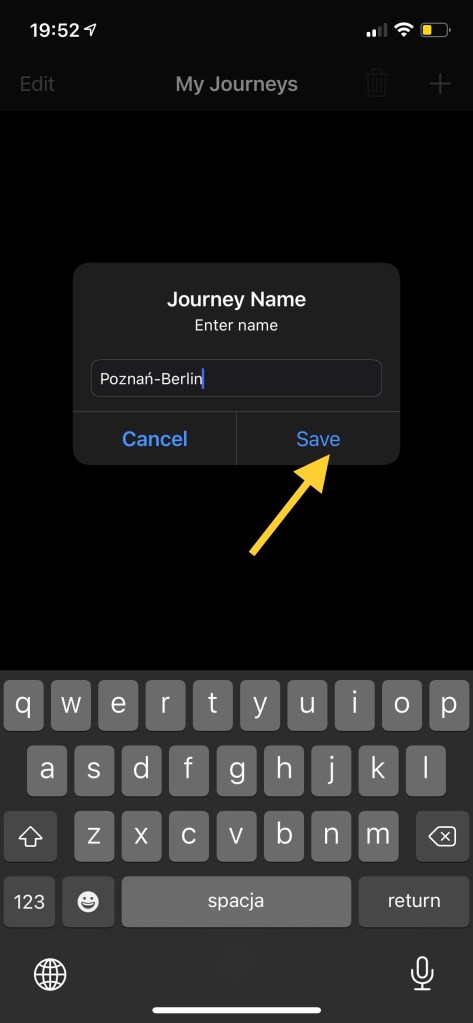
Then enter the name if your Journey and press “Save”.
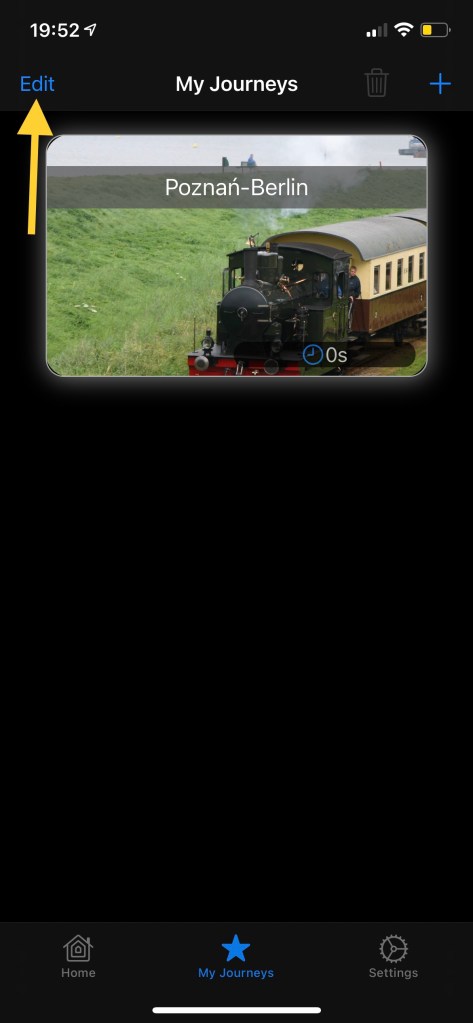
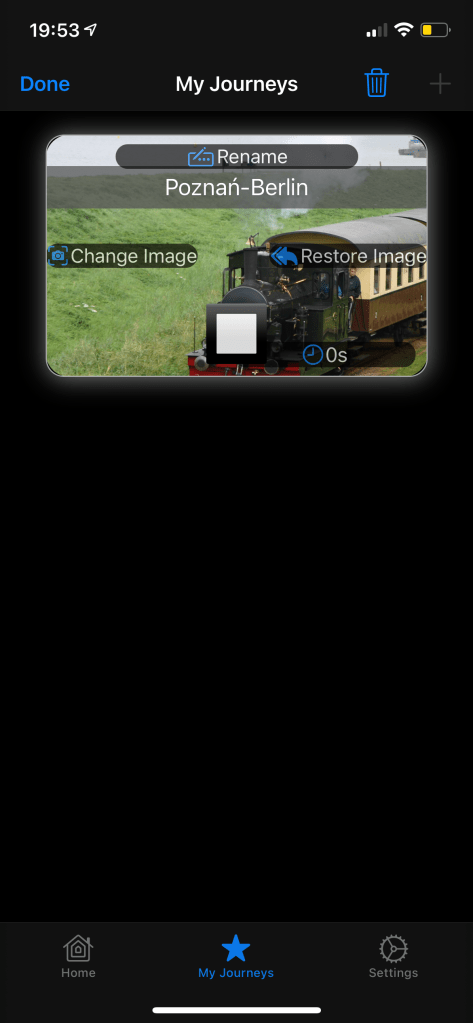
The new Journey has been created. Initially there are no Events, so the duration is 0 seconds. The App assigns a random image but you may choose your own and edit some Jourey options by tapping “Edit”.
The Journey will enter the “Edit” mode. You can:
– Rename it
– Change the image make sure that the image you choose has similar ration to the Journey frame)
– Restore the original image
– Select it and delete it by tapping the top right trash icon.
To complete the operation press “Done” and tap the Journey to enter and start adding Events.
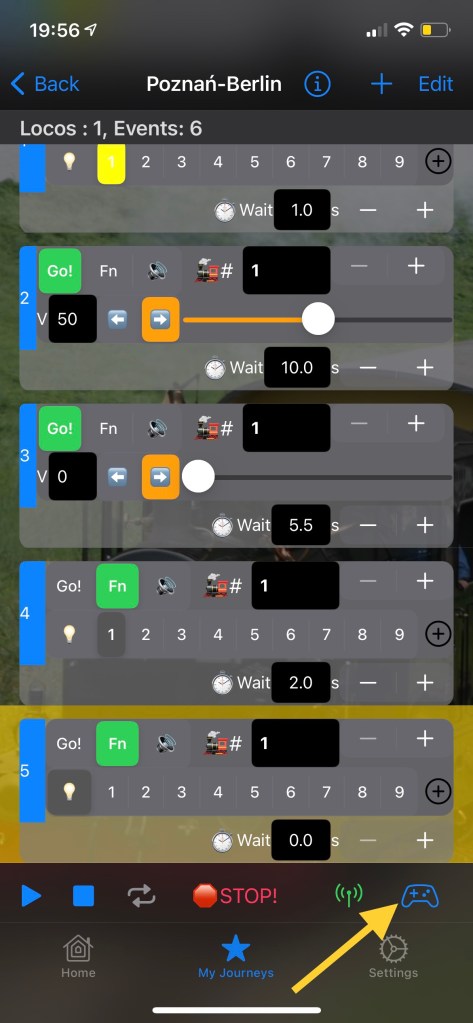
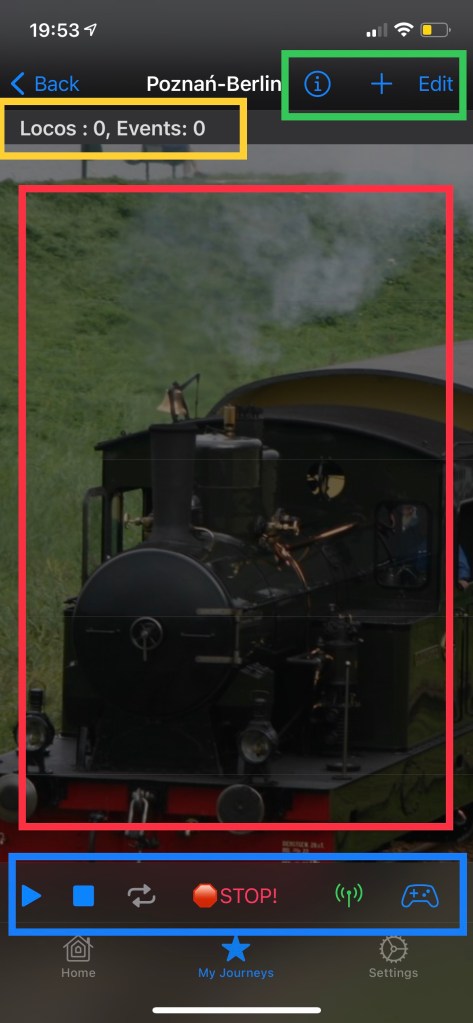
Once you entered your Journey, initially it’s empty. Let’s have a look at the Journey screen components:
On the very top in green: Info button, Add Event button, Edit Event list button.
In Yellow the summary of number of Locos and Events
Red shows the main part which is the Event List. Initially empty.
Blue – The player panel:
– Play Journey
– Stop Playing
– Repeat (In-app Purchase feature)
– Emergency STOP (while playing)
– Listen for incoming data
– Open Control and Record Center
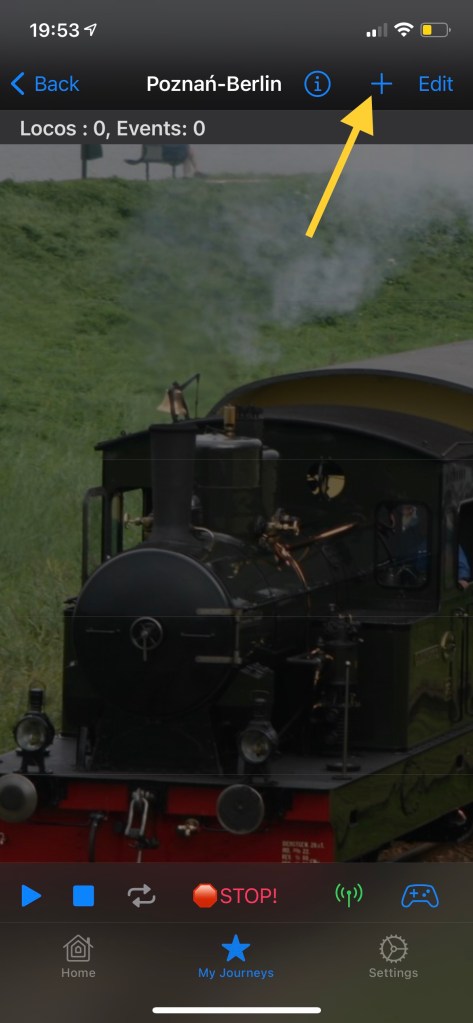
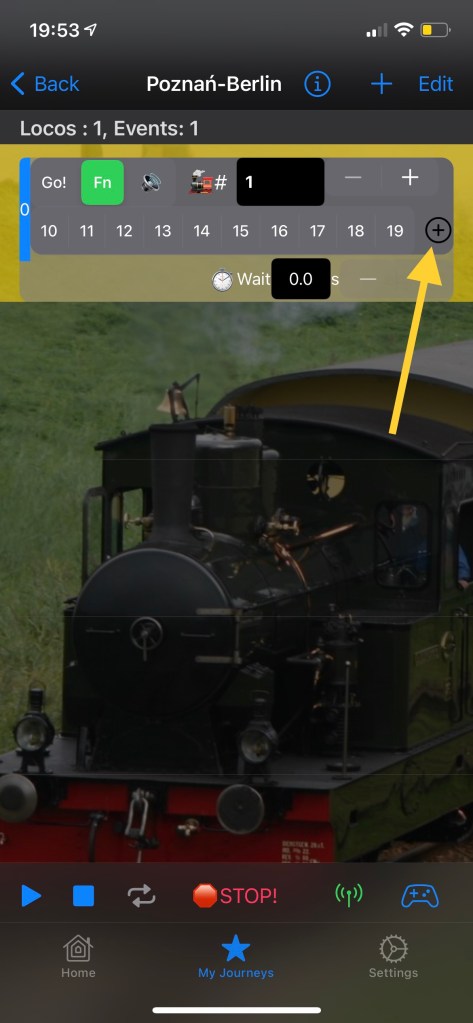
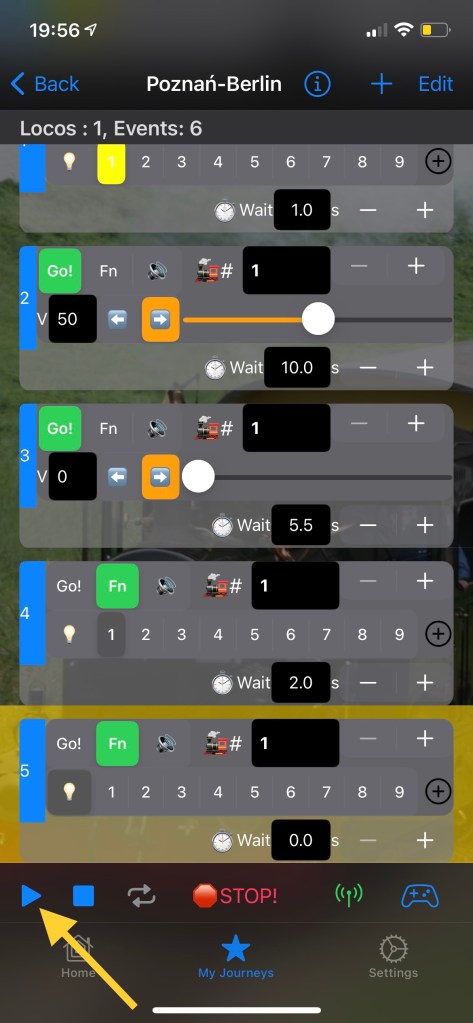
We will start by manually Scheduling new Events. Tap on the “+” button at the top right.
A new Event has been added to your Journey. The Event has a mini-control panel to manage the Loco or App behaviour in a single step.
You may control the following actions:
– “Go!” – Loco Driving: Speed, Diection
– “Fn” – Function on/off
– “Speaker icon” – System sound: useful if your loco doesn’t have a sound decoder
– “Loco Address” icon, let’s keep the loco with decoder address #1 for now.

Tap “Fn” to see Functions. This panel has function numbers from 0 – Light (Bulb). Tap on the function to schedule activation.
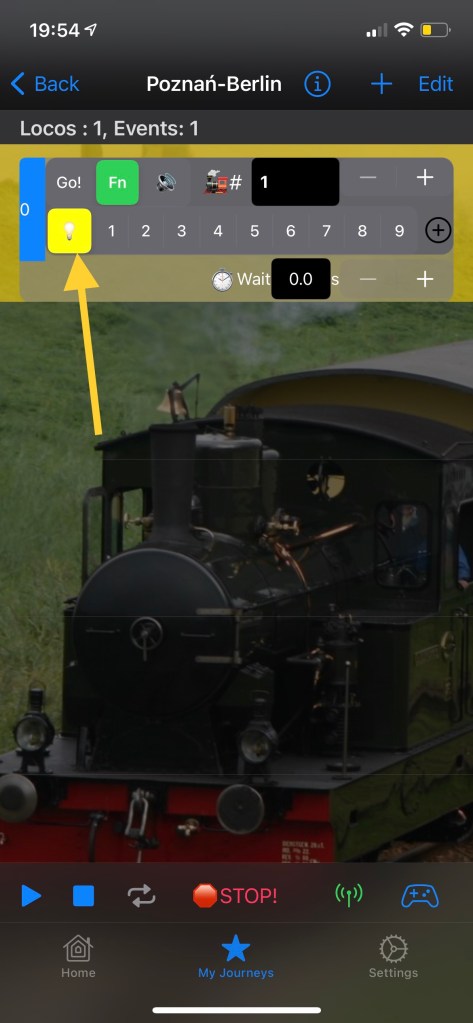
More function numbers can be viewed by tapping “+” on the right.
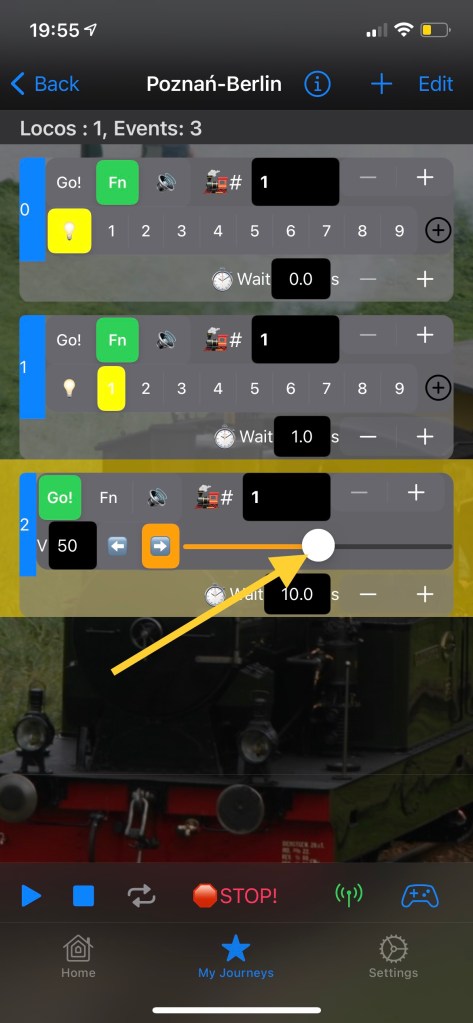
As explained at the beginnning, Events are atomic i.e. an Event can manage one function at a time. To schedule another function and another Event and schedule activation of F1 (usually engine sound) in this example. Next, we can set a delay, waiting time that must elapse before moving to the next Event. This can be done by inceasing “Wait” value (increase/desrease step: 0.25s). You may press the number field and input the number from the keyboard (Integer) and adjust by pressing “+” or “-” button.

After setting a delay, let’s add another Event – driving with 50% of the speed. The speed steps are defined by default to 128 steps, so the 50% will be mapped to step 64 of a DCC decoder.
Set delay to the next Event to 10 seconds. It means that schedule the loco to run for 10 seconds before we move to the next Event.
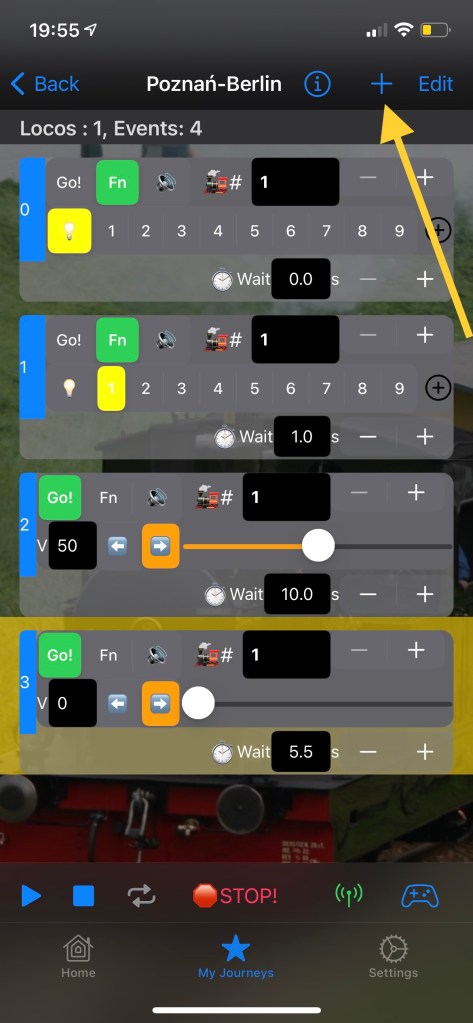
After scheduling the Drive Event we add another Event to stop the loco; V = 0. And what is important we delay next Event by 5.5s because the loco won’t stop immiediately so we must give it ample time to stop.
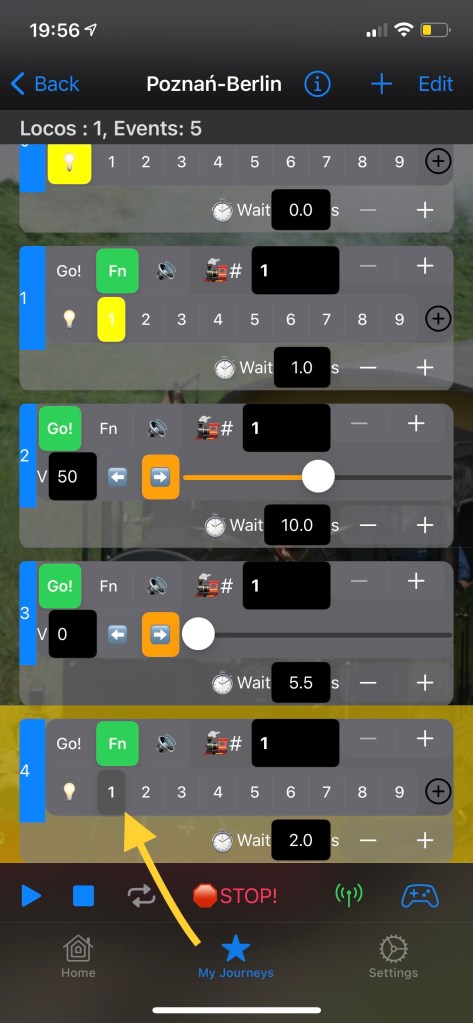
When 5.5s elapse let’s turn off the light and F1 (usually engine sound). To do this, we add two “Fn” Events and tap on the selected functions twice to make it gray. The newly added Events don’t verify the entire Loco state therefore once we add a new one we have to configure it.

After finishing adding Events we can check some info about our Journey by tapping “i” icon at the top. The Summary contains
– Loco addressed being used
– Event count
– Duration rounded to full secondes.
Press “OK” to exit the Summary.

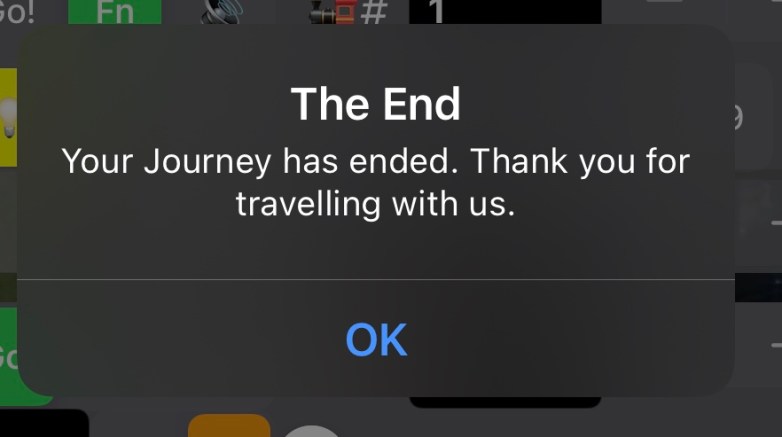
Press Play button. The App will start playing the Journey by taking each Event, trying to send requests to the DCC station. If you’re connected to the DCC station your Loco #1 will start responding to the Events. Otherwise the Journey will be dry-played only by showing which Event is being executed.
Once the Journey has been completed you will be notified.
You have completed the Tutorial for manual Journey creation and scheduling. Please have a look at the video showing the same Journey in for the Piko SmartControl set.
Please go to the next unit to learn more about controlling and recording.
